How to Add Custom Button to Admin Sales Invoice View in Magento 2

Would you like to add custom button to admin sales invoice view? Let’s do how you can easily do that by creating a Magento 2 Extension! The best way to do that is by creating a Magento 2 plugin to extend the behavior of the public function setLayout of the class.
The plugin or Interceptor is a class the modifies the behavior of the public class method by interceptions. The plugin gives users three options to use After methods, Before methods and Around Method.
How to Add Custom Button to Admin Sales Invoice View in Magento 2
Each component will have its own custom function depending on the purpose of each person. We will introduce several ways to add a new element to order view, code snippets are under a module named Dolphin_Menu. We start by using a plugin targeting ‘beforeSetLayout’.
We are already learned how to create a basic module in Magento 2. We need to create module.xml and registration.php file. You can create module.xml and registration.php from this tutorial.
Step 1: Create Dependency injection (di.xml) under the adminhtml scope,
Now we create Dependency injection file di.xml in app/code/Dolphin/InvoiceEmail/etc/adminhtml with the following code.
<?xml version="1.0" ?>
<config xmlns:xsi="http://www.w3.org/2001/XMLSchema-instance" xsi:noNamespaceSchemaLocation="urn:magento:framework:ObjectManager/etc/config.xsd">
    <type name="Magento\Sales\Block\Adminhtml\Order\Invoice\View">
        <plugin name="Dolphin_InvoiceEmail_Order_View" type="Dolphin\InvoiceEmail\Plugin\Adminhtml\Order\Invoice\View" sortOrder="10" disabled="false"/>
    </type>
</config>
View class to add button and its attributes
Hire Custom Magento 2 Extension Developer
Step 2: Create plugin class View.php
Finally, add in the Plugin class. As with the default invoice view plugin, a beforeSetLayout() method is defined, and the button is added as part of the \Magento\Sales\Block\Adminhtml\Order\Invoice\View class.
Create plugin class file View.php in app/code/Dolphin/InvoiceEmail/Plugin/Adminhtml/Order/Invoice folder with the following code.
<?php
namespace Dolphin\InvoiceEmail\Plugin\Adminhtml\Order\Invoice;

use Magento\Backend\Model\UrlInterface;
use Magento\Framework\ObjectManagerInterface;

class View
{
    protected $object_manager;
    protected $_backendUrl;

    public function __construct(
        \Magento\Backend\Block\Widget\Context $context,
        ObjectManagerInterface $om,
        UrlInterface $backendUrl,
        array $data = []
    ) {
        $this->object_manager = $om;
        $this->_backendUrl = $backendUrl;
    }

    public function beforeSetLayout(\Magento\Sales\Block\Adminhtml\Order\Invoice\View $view)
    {
        if ($view->getInvoice()->getId()) {
            $url = $this->_backendUrl->getUrl('dolphininvoice/email/send/invoice_id/' . $view->getInvoice()->getId());
            $view->addButton(
                'order_send_email',
                [
                    'label' => __('Send Email'),
                    'class' => 'custom-email-send primary',
                    'onclick' => 'setLocation(\'' . $url . '\')',
                ]
            );
            //$view->removeButton('send_notification');
        }

    }

}
- $view->addButton: Selector for the element used for item adding.
- [dt_code]addButton($buttonId, $data, $level = 0, $sortOrder = 0, $region = ‘toolbar’)[/dt_code]
- $buttonId: Unique id for button (string) ex: order_send_email
- $data: You can add button label ,class, type ,onclick, etc.. (array)
- $level: Default level is 0.You can add level of button. (integer)
- $sortOrder: Default sort order is 0.You can add sort order of button. (integer)
- $region: That button should be displayed in (‘toolbar’, ‘header’, ‘footer’, null) (string|null)
- $view->removeButton: Selector for the element used for item removing.
- [dt_code]removeButton($buttonId)[/dt_code]
- $buttonId: Unique id for button (string).Pass button id you remove it.
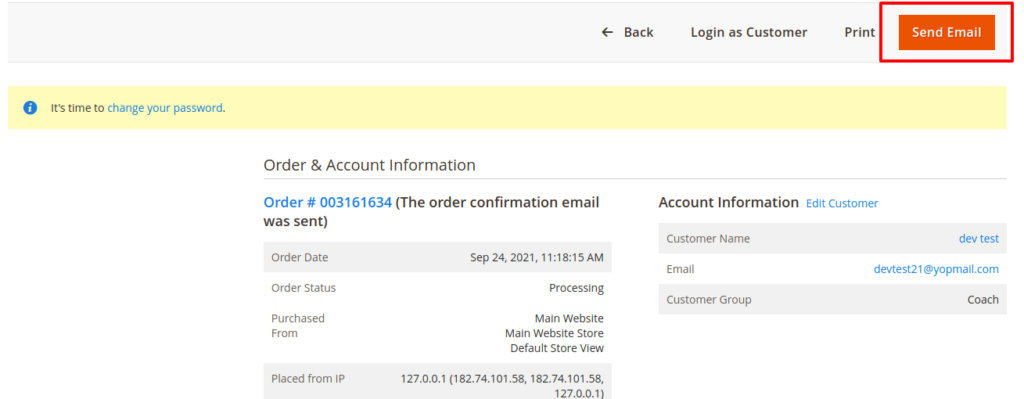
Result:
Clear cache and you will be able to find your custom button under the sales invoice view section in your Magento 2 backend.

If you have any queries regarding this post, use the comment section below!
Happy Coding!
