How To Add Date Picker In System Configuration Magento 2

Magento 2 How to add date picker in system configuration focus to calendar popup.Date picker helps enhance the user experience: Instead of using the keyboard, the user can simply click to select on the calendar.
In this article, we will how to add a date selection/date picker field in system configuration Magento 2.
The system.xml is a configuration file which is used to create configuration fields in Magento 2 System Configuration.
The system.xml is a configuration file which is used to create configuration fields in Magento 2 System Configuration. You will need this if your module has some settings which the admin needs to set. You can go to Store -> Setting -> Configuration to check how it look like.
Read this: How to add dynamic rows in system configuration Magento 2
Steps to Add Date Picker In System Configuration in Magento
We are already learned how to create a basic module in Magento 2. We need to create module.xml and registration.php files. You can create module.xml and registration.php from this tutorial.
Here we are using Dolphin as Vendor name and InvoiceEmail as the name of the module. You can change this according to your Vendor and Module name.
Step 1: Create System XML
Create system config file system.xml in app/code/Dolphin/InvoiceEmail/etc/adminhtml folder with the following code.
<?xml version="1.0"?>
<config xmlns:xsi="http://www.w3.org/2001/XMLSchema-instance"
        xsi:noNamespaceSchemaLocation="urn:magento:module:Magento_Config:etc/system_file.xsd">
    <system>
        <tab id="dolphintab" translate="label" sortOrder="100">
            <label>Dolphin</label>
        </tab>
        <section id="datetime" translate="label" type="text" sortOrder="10" showInDefault="1" showInWebsite="1"
                 showInStore="1">
            <class>separator-top</class>
            <label>Date Time</label>
            <tab>dolphintab</tab>
            <resource>Dolphin_InvoiceEmail::config_extension</resource>
            <group id="general" translate="label" type="text" sortOrder="10" showInDefault="1" showInWebsite="1"
                   showInStore="1">
                <label>General</label>
                <field id="customdate" translate="label" type="date" showInDefault="1" showInWebsite="1"
                       showInStore="1">
                    <label>Date Field</label>
                    <frontend_model>Dolphin\InvoiceEmail\Block\Adminhtml\DateTime</frontend_model>
                </field>
            </group>
        </section>
    </system>
</config>
The magento 2 system configuration page is divided logically into a few parts: Tabs, Sections, Groups, Fields.
The system.xml is located in app/code/Dolphin/InvoiceEmail/etc/adminhtml folder of the module, we will create a new Tab for our vendor “Dolphin”, a new Section for our module “Date Time“, a Group to contain “General” simple fields: Date Field.
Step 2: Create DatePicker
Create DatePicker class in file DateTime.php in app/code/Dolphin/InvoiceEmail/Block/Adminhtml folder with the following code.
<?php

namespace Dolphin\InvoiceEmail\Block\Adminhtml;

use Magento\Framework\Registry;
use Magento\Backend\Block\Template\Context;

class DateTime extends \Magento\Config\Block\System\Config\Form\Field
{
    /**
     * @var  Registry
     */
    protected $_coreRegistry;

    /**
     * @param Context $context
     * @param Registry $coreRegistry
     * @param array $data
     */
    public function __construct(
        Context  $context,
        Registry $coreRegistry,
        array    $data = []
    )
    {
        $this->_coreRegistry = $coreRegistry;
        parent::__construct($context, $data);
    }

    public function render(\Magento\Framework\Data\Form\Element\AbstractElement $element)
    {
        $element->setDateFormat(\Magento\Framework\Stdlib\DateTime::DATE_INTERNAL_FORMAT);
        $element->setTimeFormat("HH:mm:ss"); //set date and time as per requirment
        return parent::render($element);
    }
}
Above class, file extends the class \Magento\Config\Block\System\Config\Form\Field
There are four date formats to use:
- DATETIME_INTERNAL_FORMAT: yyyy-MM-dd HH:mm:ss
- DATE_INTERNAL_FORMAT: yyyy-MM-dd
- DATETIME_PHP_FORMAT: Y-m-d H:i:s
- DATE_PHP_FORMAT: Y-m-d
Now execute the below command and go to the system configuration page:
[dt_highlight color="" text_color="" bg_color=""]php bin/magento c:c[/dt_highlight]
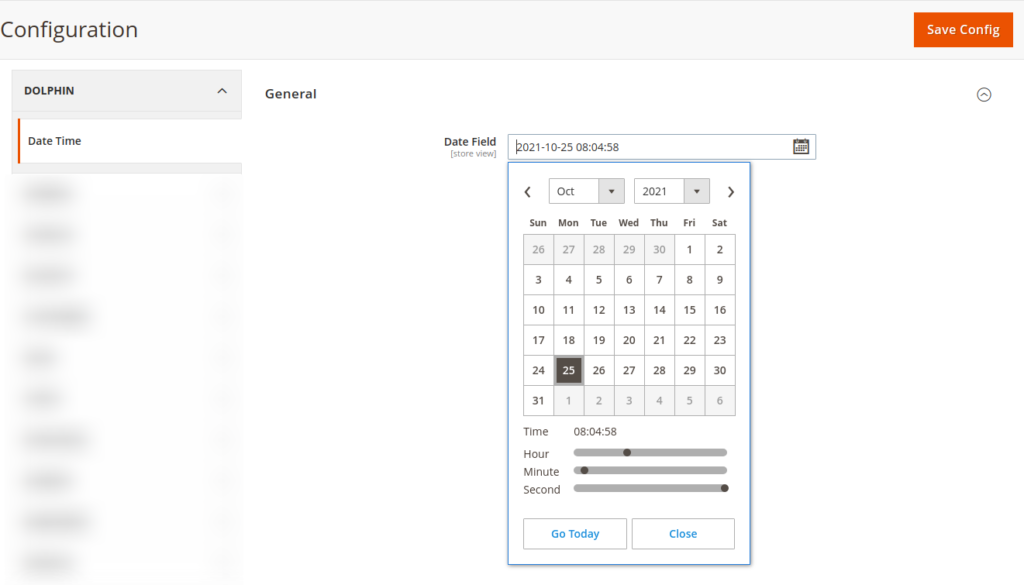
Result:
After you implement the above code, check output in the admin panel of Magento 2. The date and Time picker will be displayed in the system configuration.

I Hope, This instruction will be helpful for you.
If you have any difficulties regarding this blog, do consider them posting in the Comments section below!
I’m here to help.
Thank you!
