How to add Javascript Form Validation in Hyva Magento 2

In this blog post, we will be discussing how to add JavaScript form validation in Hyva Magento 2.
It is important to validate forms in Magento 2 to ensure that the information provided by users is properly formatted and to prevent spam and malicious submissions.
Hyva primarily uses built-in browser form validation, in some cases, JavaScript validation may be necessary to display custom validation messages in a specific location.
Here are the steps to validate forms in Hyva Magento 2:
Step 1: Register your module
Follow this link to create custom module in magento 2
https://dolphinwebsolution.com/how-to-create-module-in-magento-2
Step 2 : Setup your layout
app/code/Dolphin/ValidateHyvaForm/view/frontend/layout/hyva_dolphin_index_index.xml
<page xmlns:xsi="http://www.w3.org/2001/XMLSchema-instance"
      xsi:noNamespaceSchemaLocation="urn:magento:framework:View/Layout/etc/page_configuration.xsd">
    <update handle="hyva_form_validation"/>

    <referenceContainer name="content">
        <block class="Magento\Framework\View\Element\Template" name="form" template="Dolphin_ValidateHyvaForm::form.phtml" />
    </referenceContainer>

</page>
Here we load the advanced form validation on the page by applying the layout handle hyva_form_validation.
Step 3 : Create template
app/code/Dolphin/ValidateHyvaForm/view/frontend/templates/form.phtml
<div class="container">
    <form class="form" action="<?= $block->escapeHtmlAttr($block->submitFormUrl()) ?>" method="post" autocomplete="off"
          x-data="hyva.formValidation($el)" @submit="onSubmit">

        <div class="field field-reserved w-full required">
            <label for="firstname" class="label">
                <span> <?= $block->escapeHtml(__('First Name:')) ?> </span>
            </label>
            <div class="control">
                <input type="text" name="firstname" id="firstname" class="w-full form-input"
                       data-validate='{"required": true}'>
            </div>
        </div>

        <div class="field field-reserved w-full required">
            <label for="firstname" class="label">
                <span> <?= $block->escapeHtml(__('Last Name:')) ?> </span>
            </label>
            <div class="control">
                <input type="text" name="lastname" id="lastname" class="w-full form-input"
                       data-validate='{"required": true}'>
            </div>
        </div>

        <div class="field field-reserved w-full required">
            <label for="email" class="label">
                <span> <?= $block->escapeHtml(__('Email:')) ?> </span>
            </label>
            <div class="control">
                <input type="text" name="email" id="email" class="w-full form-input"
                       data-validate='{"required": true , "email": true}' @change="onChange">
            </div>
        </div>

        <div class="actions-toolbar">
            <div class="primary">
                <button type="submit"
                        id="inq-submit"
                        class="action submit primary"
                        title="<?= $block->escapeHtmlAttr(__('Submit')) ?>">
                    <span><?= $block->escapeHtml(__('Submit')) ?></span>
                </button>
            </div>
        </div>

    </form>
</div>
Here we Initialise the form validation Alpine.js component hyva.formValidation($el)
<form x-data="hyva.formValidation($el)">
If you want to add additional logic, merge the form validation component with your custom component properties.
<form x-data="{...initMyCustomComponent(), ...hyva.formValidation($el)}">
You can trigger the validation of the whole form using the Alpine.js @submit event with the onSubmit method.
<form x-data="hyva.formValidation($el)" @submit="onSubmit">
If you want to trigger validation on a change event, use the @change event.
<div class="field field-reserved">
    <input name="example" data-validate='{"required": true}' @change="onChange" />
</div>
If you want to use multiple validation rules in the same element, use a JSON object like this: data-validate='{“min”: 2, “required”: true}’.
<div class="field field-reserved">
    <input type="number" data-validate='{"min": 2, "required": true}' />
</div>
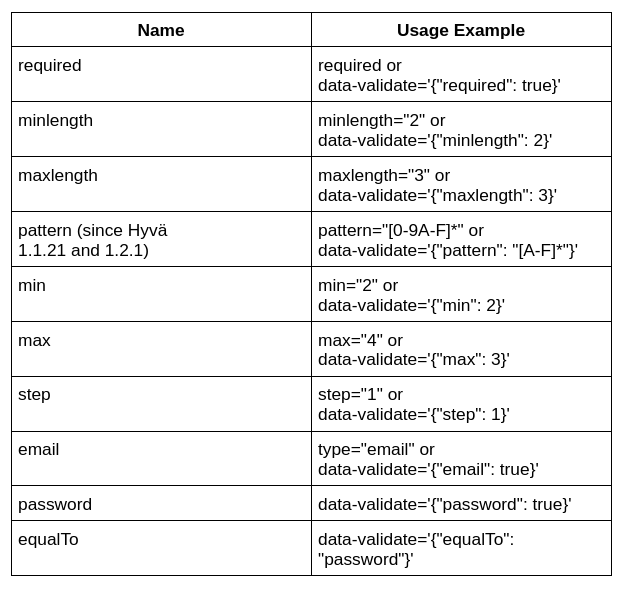
Available Rule validators in Magento Hyva
You can also add your custom Rule validator in hyva by using the method hyva.formValidation.addRule
Adding new validation rules
To add a new validation rule, use the hyva.formValidation.addRule method and pass a new validation function.
hyva.formValidation.addRule('phone', function(value, options, field, context) {
    const phoneNumber = value.trim().replace(' ', '');
    if (phoneNumber.length !== 10) {
        // return message if validation fails;
        return '<?= $escaper->escapeJs(__("Enter correct phone number, like XXX XXX XXXX")) ?>';
    } else {
        // return true if validation passed
        return true;
    }
});
The first argument is the validator name and the second argument is the validator rule callback.
Validation rule functions should return one of the following values.
- The boolean true if the rule is valid.
- A string message if the rule is invalid. The string should describe the failure in a helpful way
- A Promise that resolves to true or a message string when the validation completes.
And that’s it! This is how you can validate forms in Hyva Magento 2. Visit this page for Hyva development service.


