How to Add WYSIWYG Editor in System Configurations Magento 2

WYSIWYG is a content editing tool.In WYSIWYG editors the edited content whether text or graphics, appears in a form close to a final product.WYSIWYG HTML editor is an extremely useful tool to give your clients ability for editing and updating their website without bothering coders.
The WYSIWYG editor is enabled by default, and can be used to edit content on CMS pages and blocks, and in products and categories. From the configuration you can activate or deactivate the editor, and elect to use static, rather than dynamic, URLS for media content in product and category descriptions.
TinyMCE 4 is the default WYSIWYG editor. The implemented version, which is actually 4.6, offers an improved user experience and supports a wide range of WYSIWYG plugins. TinyMCE 3 was deprecated in the 2.4.0 release and is now removed in the 2.4.3 release.
The system.xml is a configuration file which is used to create configuration fields in Magento 2 System Configuration. You will need this if your module has some settings which the admin needs to set. You can go to Store -> Setting -> Configuration to check how it look like.
Steps to Add WYSIWYG Editor in System Configurations Magento 2
We are already learned how to create a basic module in Magento 2. We need to create module.xml and registration.php files. You can create module.xml and registration.php from this tutorial.
Here we are using Dolphin as Vendor name and InvoiceEmail as the name of the module. You can change this according to your Vendor and Module name.
Step 1: Create System XML
Create system config file system.xml in app/code/Dolphin/InvoiceEmail/etc/adminhtml folder with the following code.
<?xml version="1.0"?>
<config xmlns:xsi="http://www.w3.org/2001/XMLSchema-instance"
        xsi:noNamespaceSchemaLocation="urn:magento:module:Magento_Config:etc/system_file.xsd">
    <system>
        <tab id="dolphintab" translate="label" sortOrder="100">
            <label>Dolphin</label>
        </tab>
        <section id="dolphin" translate="label" type="text" sortOrder="10" showInDefault="1" showInWebsite="1"
                 showInStore="1">
            <class>separator-top</class>
            <label>label</label>
            <tab>dolphintab</tab>
            <resource>Dolphin_InvoiceEmail::config_extension</resource>
            <group id="general" translate="label" type="text" sortOrder="10" showInDefault="1" showInWebsite="1"
                   showInStore="1">
                <label>General</label>
                <field id="description" translate="label comment" type="editor" sortOrder="20" showInDefault="1"
                       showInWebsite="1" showInStore="1">
                    <label>Description</label>
                    <frontend_model>Dolphin\InvoiceEmail\Block\Adminhtml\Editor</frontend_model>
                </field>
            </group>
        </section>
    </system>
</config>
The magento 2 system configuration page is divided logically into a few parts: Tabs, Sections, Groups, Fields.
The system.xml is located in app/code/Dolphin/InvoiceEmail/etc/adminhtml folder of the module, we will create a new Tab for our vendor “Dolphin”, a new Section for our module “label“, a Group to contain “General” simple fields: Description.
Step 2: Create Editor Class
Create Editor class in file Editor.php in Dolphin\InvoiceEmail\Block\Adminhtml folder with the following code.
<?php

namespace Dolphin\InvoiceEmail\Block\Adminhtml;

use Magento\Backend\Block\Template\Context;
use Magento\Cms\Model\Wysiwyg\Config as WysiwygConfig;

class Editor extends \Magento\Config\Block\System\Config\Form\Field
{
    public function __construct(
        Context $context,
        WysiwygConfig $wysiwygConfig,
        array $data = []
    )
    {
        $this->_wysiwygConfig = $wysiwygConfig;
        parent::__construct($context, $data);
    }

    protected function _getElementHtml(\Magento\Framework\Data\Form\Element\AbstractElement $element)
    {
        $element->setWysiwyg(true);
        $element->setConfig($this->_wysiwygConfig->getConfig($element));
        return parent::_getElementHtml($element);
    }
}
Above class, file extends \Magento\Config\Block\System\Config\Form\Field
Now execute the below command and go to the system configuration page:
[dt_highlight color="" text_color="" bg_color=""]php bin/magento c:c[/dt_highlight]
Result:-
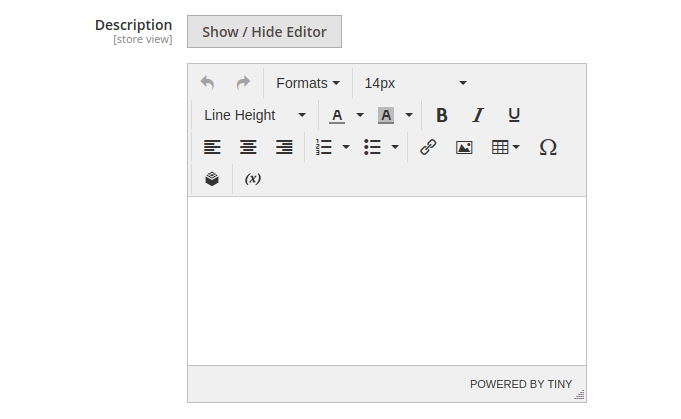
After you implement the above code, check output in the admin panel of Magento 2. The WYSIWYG Editor will be displayed in the system configuration.

I Hope, This instruction will be helpful for you.
If you have any difficulties regarding this blog, do consider them posting in the Comments section below!
I’m here to help.
Thank you!
